


")

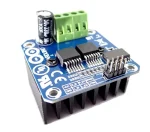


The Operating Voltage of 24V And Continuous current of 43A Max, PWM capability of up to 25 kHz combined with active freewheeling
In this article, I want to show you how we can use it with Arduino to control a high-power Motor and change the PWM Frequency of the Arduino.
Step 1: Inside the Datasheet


This IC has a good protection circuit such as :
1) Undervoltage Shut Down: To avoid uncontrolled motion of the driven motor at low voltages, the device shuts off.
If the Supply voltage VUV(OFF) drops under 5.4V, The Motor driver will switch Off And won’t turn on until the Supply voltage increases to 5.5V or more.
2)Overtemperature Protection: The BTS 7960 is protected against overtemperature by an integrated temperature
sensor. Overtemperature leads to a shut down of both output stages.
3)Current Limitation: The current in the bridge is measured in both switches, the High and Low sides. If the current reaches the limit current (Iclx), the switch is deactivated, and the other switch is activated for a certain time(Tcls).
You can read the datasheet for more info
Attachments

Step 2: Connect It to the Arduino


Simple code for arduino below .
/*……………………
BTS7960 Motor Driver Test
Written By : Mohannad Rawashdeh
Code for :
https://www.instructables.com/member/Mohannad+Rawashdeh/
*/
int RPWM=5;
int LPWM=6;
// timer 0
int L_EN=7;
int R_EN=8;
void setup() {
// put your setup code here, to run once:
for(int i=5;i<9;i++){
pinMode(i,OUTPUT);
}
for(int i=5;i<9;i++){
digitalWrite(i,LOW);
}
delay(1000);
Serial.begin(9600);
}
void loop() {
// put your main code here, to run repeatedly:
Serial.println(“EN High”);
digitalWrite(R_EN,HIGH);
digitalWrite(L_EN,HIGH);
delay(1000);
for(int i=0;i<256;i++){
analogWrite(RPWM,i);
// analogWrite(LPWM,255-i);
delay(100);
}
delay(500);
for(int i=255;i>0;i–){
analogWrite(RPWM,i);
// analogWrite(LPWM,255-i);
delay(100);
}
delay(500);
Serial.println(“EN LOW”);
digitalWrite(R_EN,LOW);
digitalWrite(L_EN,LOW);
delay(1000);
for(int i=0;i<256;i++){
analogWrite(RPWM,i);
delay(100);
}
delay(500);
for(int i=255;i>0;i–){
analogWrite(RPWM,i);
delay(100);
}
delay(500);
}
And this is a video to show how this code works
the PWM Frequency on the arduino UNO Atmega328p – Timer0 is 970Hz , This is a low PWM Frequency , in the next step we want to increase PWM Frequency .
Step 3: PWM … Arduino Timer


Timer0 is connected to pins D5 and D6, we want to increase the frequency for smooth control.
Note that Timer0 controls the (delay, millis ) on the Arduino, so any change on the prescale of this timer will change the delay and millis time.
int RPWM=5;
int LPWM=6;
int L_EN=7;
int R_EN=8;
void setPWMfrequency(int freq){
TCCR0B = TCCR0B & 0b11111000 | freq ;
}
void MotorActiveStatus(char Side,boolean s){
boolean state=s;
if(Side==’R’){
digitalWrite(R_EN,s);
}
if(Side==’L’){
digitalWrite(L_EN,s);
}
}
void setMotor(char side,byte pwm){
if(side==’R’){
analogWrite(RPWM,pwm);
}
if(side==’L’){
analogWrite(LPWM,pwm);
}
}
void closeMotor(char side){
if(side==’R’){
digitalWrite(RPWM,LOW);
}
if(side==’L’){
digitalWrite(LPWM,LOW);
}
}
void setup() {
// put your setup code here, to run once:
setPWMfrequency(0x02);// timer 0 , 3.92KHz
for(int i=5;i<9;i++){
pinMode(i,OUTPUT);
}
for(int i=5;i<9;i++){
digitalWrite(i,LOW);
}
delay(1000);
MotorActiveStatus(‘R’,true);
MotorActiveStatus(‘L’,true);
Serial.begin(9600);
}
void loop() {
// put your main code here, to run repeatedly:
for(int i=0;i<256;i++){
setMotor(‘R’,i);
delay(500);
}
delay(1000);
closeMotor(‘R’);
delay(1000);
for(int i=0;i<256;i++){
setMotor(‘L’,i);
delay(500);
}
delay(1000);
closeMotor(‘L’);
delay(1000);
}
if we want to use this code with another timer ” timer 2 ” just change D5 , D6 To pin D3 , D11 Respectively
int RPWM=3;
int LPWM=11;
int L_EN=7;
int R_EN=8;
void setPWMfrequency(int freq){
TCCR2B = TCCR2B & 0b11111000 | freq ;
}
void MotorActiveStatus(char Side,boolean s){
boolean state=s;
if(Side==’R’){
digitalWrite(R_EN,s);
}
if(Side==’L’){
digitalWrite(L_EN,s);
}
}
void setMotor(char side,byte pwm){
if(side==’R’){
analogWrite(RPWM,pwm);
}
if(side==’L’){
analogWrite(LPWM,pwm);
}
}
void closeMotor(char side){
if(side==’R’){
digitalWrite(RPWM,LOW);
}
if(side==’L’){
digitalWrite(LPWM,LOW);
}
}
void setup() {
// put your setup code here, to run once:
setPWMfrequency(0x02);// timer 2 , 3.92KHz
for(int i=5;i<9;i++){
pinMode(i,OUTPUT);
}
for(int i=5;i<9;i++){
digitalWrite(i,LOW);
}
delay(1000);
MotorActiveStatus(‘R’,true);
MotorActiveStatus(‘L’,true);
Serial.begin(9600);
}
void loop() {
// put your main code here, to run repeatedly:
for(int i=0;i<256;i++){
setMotor(‘R’,i);
delay(50);
}
delay(500);
closeMotor(‘R’);
delay(1000);
for(int i=0;i<256;i++){
setMotor(‘L’,i);
delay(50);
}
delay(500);
closeMotor(‘L’);
delay(1000);
}
Step 4: Arduino Mega Timer


timer 0 (controls pins 13, 4)
timer 1 (controls pins 12, 11)
timer 2 (controls pins 10, 9)
timer 3 (controls pins 5, 3, 2)
timer 4 (controls pins 8, 7, 6)
This code for Arduino Mega with Timers 1 and 3 :
// code for Arduino Mega2560 and BTS7960 Motor driver
// written by: Mohannad Rawashdeh
int RPWM=3;
int LPWM=11;
int L_EN=7;
int R_EN=8;
void setPWMfrequency(int freq){
TCCR1B = TCCR2B & 0b11111000 | freq ;
TCCR3B = TCCR2B & 0b11111000 | freq ;
}
void MotorActiveStatus(char Side,boolean s){
boolean state=s;
if(Side==’R’){
digitalWrite(R_EN,s);
}
if(Side==’L’){
digitalWrite(L_EN,s);
}
}
void setMotor(char side,byte pwm){
if(side==’R’){
analogWrite(RPWM,pwm);
}
if(side==’L’){
analogWrite(LPWM,pwm);
}
}
void closeMotor(char side){
if(side==’R’){
digitalWrite(RPWM,LOW);
}
if(side==’L’){
digitalWrite(LPWM,LOW);
}
}
void setup() {
// put your setup code here, to run once:
setPWMfrequency(0x02);// timer 2 , 3.92KHz
for(int i=5;i<9;i++){
pinMode(i,OUTPUT);
}
for(int i=5;i<9;i++){
digitalWrite(i,LOW);
}
delay(1000);
MotorActiveStatus(‘R’,true);
MotorActiveStatus(‘L’,true);
Serial.begin(9600);
}
void loop() {
// put your main code here, to run repeatedly:
for(int i=0;i<256;i++){
setMotor(‘R’,i);
delay(50);
}
delay(500);
closeMotor(‘R’);
delay(1000);
for(int i=0;i<256;i++){
setMotor(‘L’,i);
delay(50);
}
delay(500);
closeMotor(‘L’);
delay(1000);
}